RAW Install Guide for Microsoft Windows
Introduction
There are two ways to install RAW on Windows. The easiest, and recommended, way is to use a prebuilt installer (.msi file). If you want to install a version for which there is no prebuilt installer, you will need to install RAW from the source code.
This guide contains instructions for:
- Using a prebuilt installer (recommended):
- General instructions to install from source for advanced users
- Detailed instructions to install from source for:
It also provides solutions to common problems with the installation from source.
Some of the downloads needed to install RAW from source are available in the RAW-Windows-Source-Install-Essentials file on sourceforge. Others you will have to download yourself, due to licensing restrictions.
Conventions: things to type are in italics, file paths and file names are in bold. OS version specific instructions are started in red.
Using a prebuilt installer
The recommend way to install RAW on Windows is using a prebuilt installer. To install from a prebuilt installer, simply download the RAW-X.Y.Z-win32.msi (where X.Y.Z is the version number) file from sourceforge ( http://sourceforge.net/projects/bioxtasraw), and double click it to run the installer. You may need to navigate to the ‘Files’ tab on the sourceforge project website to find the latest .msi installer.
Important Notes:
- Because the RAW team is an ‘unknown’ developer, you will probably see some security warnings when you install RAW. When you do, just give the installer and program permission to run on your computer.
- RAW is used by (relatively) few people, which means many virus scanners have not seen
the RAW software before. Occasionally virus scanners will mark a file (typically RAW.exe)
as a threat (it will usually be in the ‘general malware’ category). If this happens,
please do the following:
- Upload the file to https://www.virustotal.com/ and see if any other virus scanners identify it as a virus (it is always possible someone hijacked the installer somehow!).
- If most or all of the virus scanners on virustotal.com clear the file, make an exception for it in your virus scanner.
- Contact the RAW developers, so we can report the false identification to the virus scanner company and get the file whitelisted in future definitions files.
General instructions for installing from source (advanced users)
Install the Microsoft Visual C++ compiler for Python 2.7
Install Python 2.7 (if it isn’t already installed) and add it to your system path.
Install a C compiler (such as the gcc c++ compiler) and add it to your system path.
Install the following Python packages (version indicated if less than most recent):
- numpy
- matplotlib
- scipy
- pillow
- wxpython
- fabio
- lxml
- h5py
- rfoo
- cython
- hdf5plugin
- pyFAI
- weave
Download the RAW source file (RAW-x.y.z-Source where x.y.z is the version number) from sourceforge ( http://sourceforge.net/projects/bioxtasraw)
Extract RAW to a directory of your choice and run RAW.py using python.
- Note: the first time you run RAW.py it may need to be run from the command line in order to successfully compile various extensions. It may take some time to compile the extensions, be patient.
- After you run RAW for the first time, you can run it by double clicking the RAW.py file, assuming .py files are associated with your python executable.
Enjoy!
- If you have problems, please consult the detailed installation guides and the solutions to common problems below. If that doesn’t help, please contact the developers.
Windows 7, 8.1, and 10 install from source instructions
Download and install the Microsoft Visual C++ Compiler for Python 2.7.
- Download from https://www.microsoft.com/en-us/download/details.aspx?id=44266
- Run the installer with the default options.
Download and install the Microsoft Visual C++ 2008 SP1 Redistributable Package (x86).
- Download from https://www.microsoft.com/en-us/download/details.aspx?id=5582
- Run the installer with the default options.
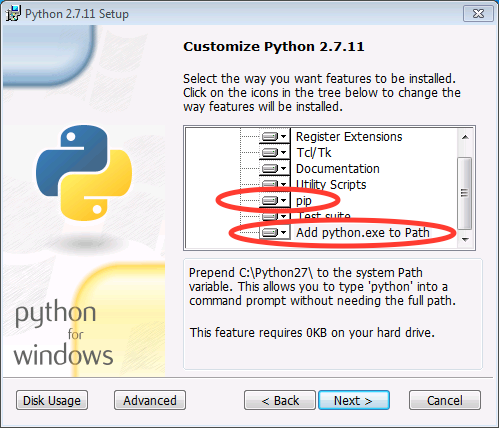
Install 32 bit python 2.7 from python.org. Make sure pip is installed, and add python to the windows path.
- Download the 32 bit python 2.7 installer for windows from
https://www.python.org/downloads/windows/
- Select the latest release (2.7.13 as of 3/13/17).
- Download the Windows x86 MSI Installer (NOT the x86-64 MSI Installer).
- Also available in the RAW-Windows-Source-Install-Essentials file.
- Run the installer
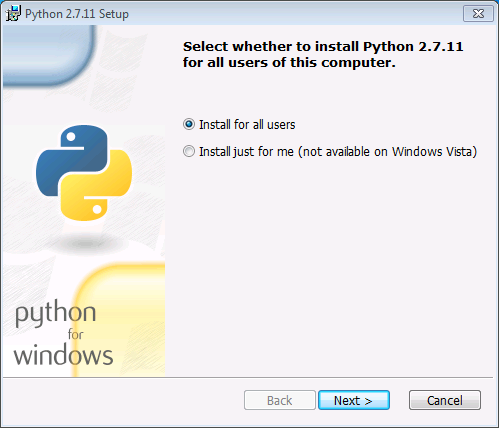
- Accept the default installation location
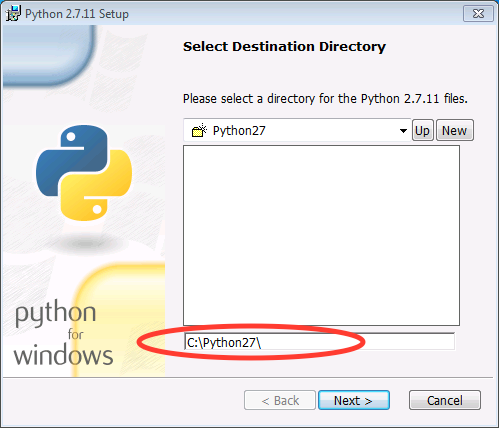
- At the customization option, make sure that pip is installed and that you add python.exe to Path.
- Download the 32 bit python 2.7 installer for windows from
https://www.python.org/downloads/windows/
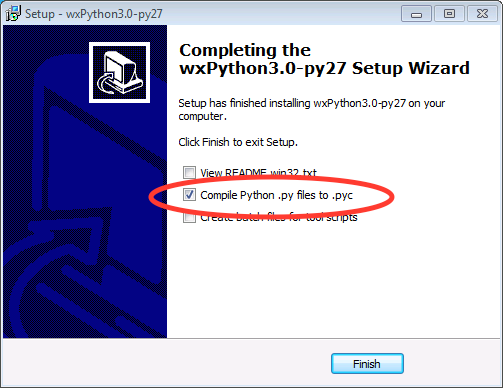
Download and install wxpython 3.0 for 32-bit python 2.7.
- Download from
http://www.wxpython.org/download.php#msw
- Download the wxPython3.0-win32-3.0.2.00-py27.exe file
- Make sure you download win32/py27 file!
- Also available in the RAW-Windows-Source-Install-Essentials file.
- Run the installer
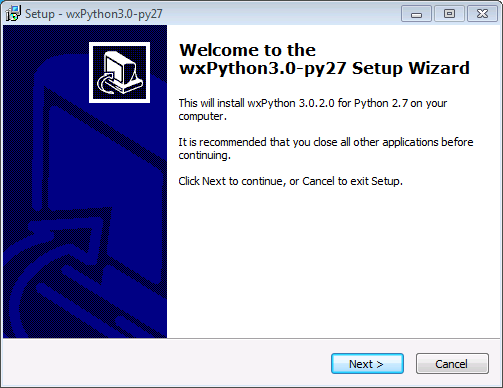
- Accept the default install location
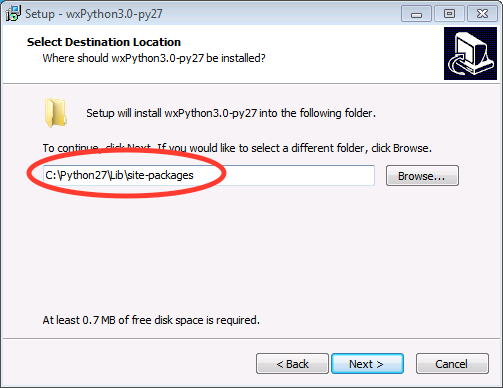
- Accept the default components
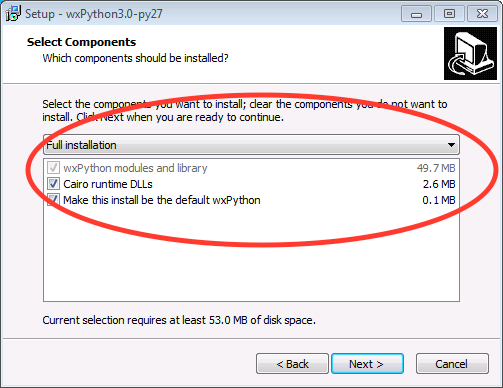
- Make sure to compile Python .py files to .pyc when the installation is finished.
- Download from
http://www.wxpython.org/download.php#msw
Download and install the MinGW compiler
- Download mingw-get-setup.exe from
https://sourceforge.net/projects/mingw/
- The download button should default to the correct file for windows.
- Also available in the RAW-Windows-Source-Install-Essentials file.
- Run the installer.
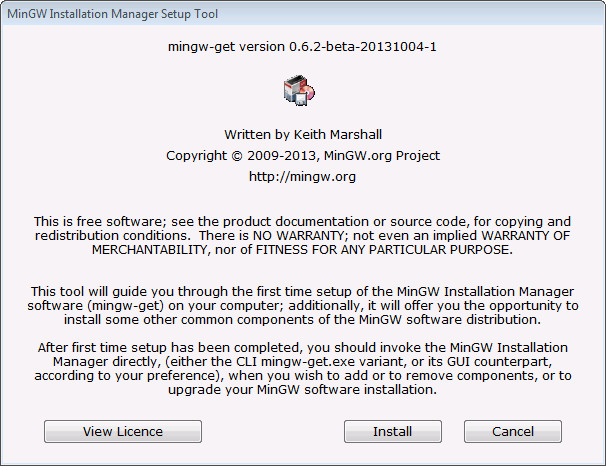
- Install to the default location
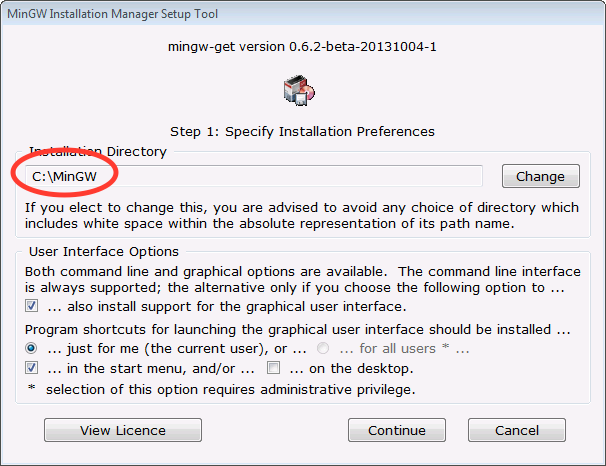
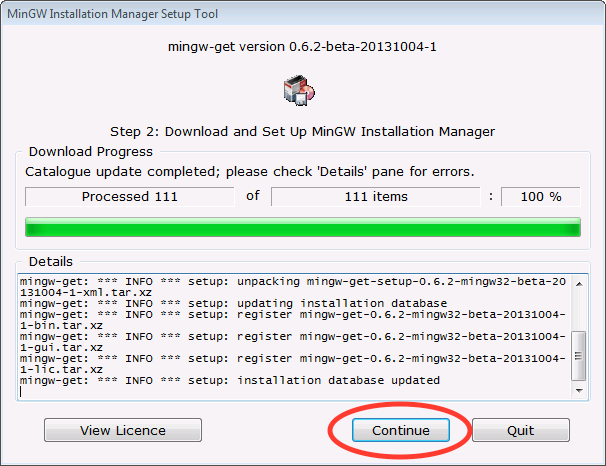
- Once the installer is finished, click continue
- You will see this screen:
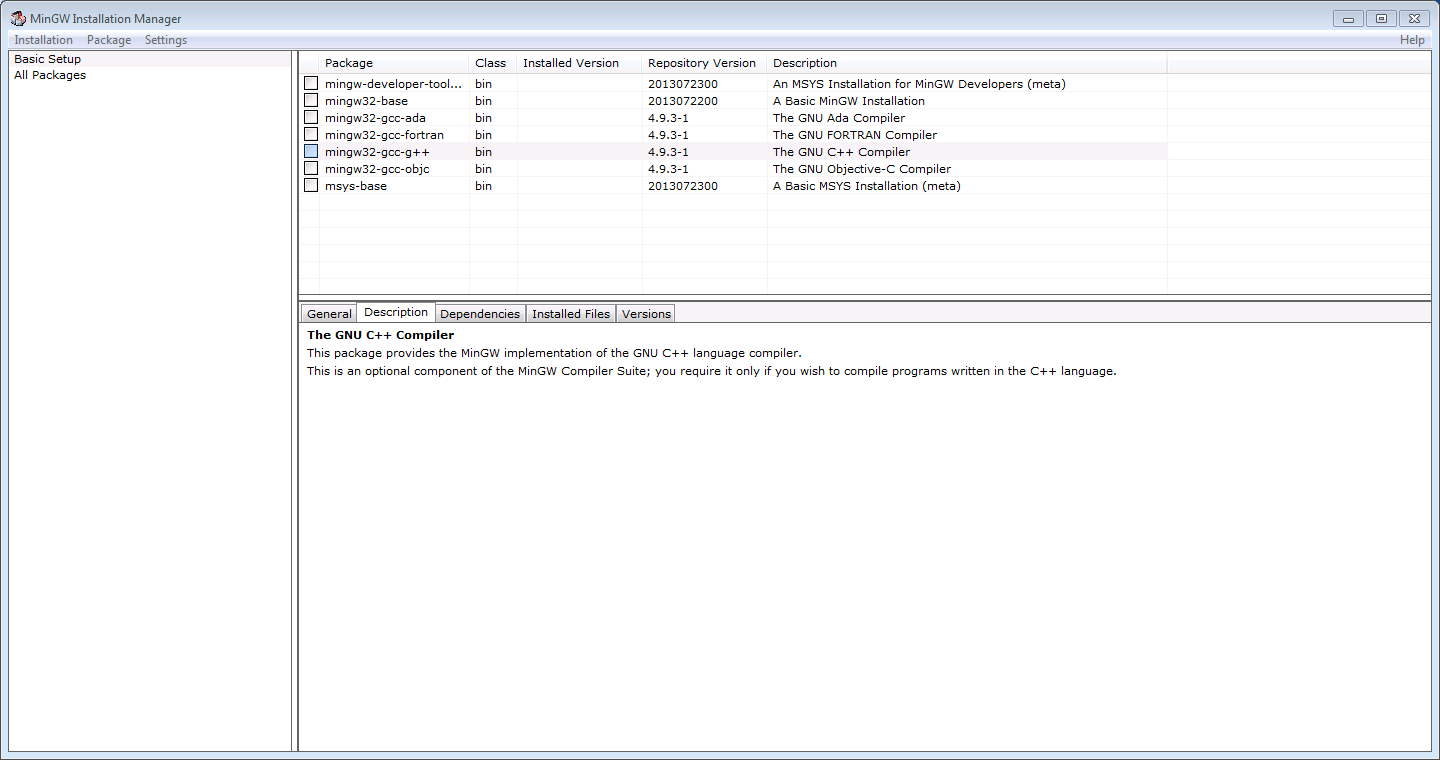
- Click the boxes for mingw32-base and mingw32-gcc-g++ and select mark for installation.
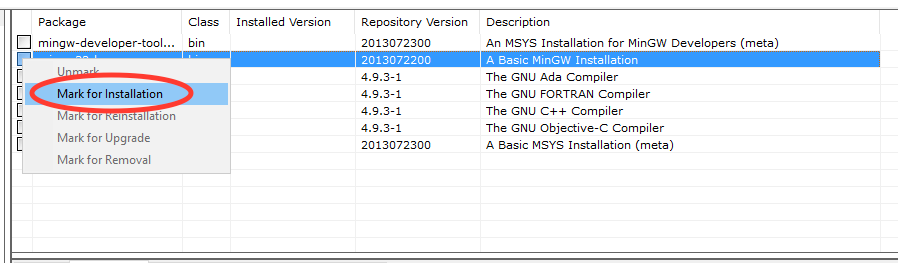
- Once selected, they should look like this:

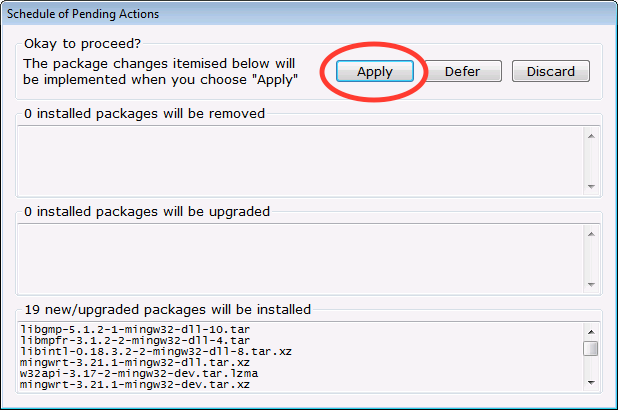
- Click on the Installation menu and click Apply Changes.
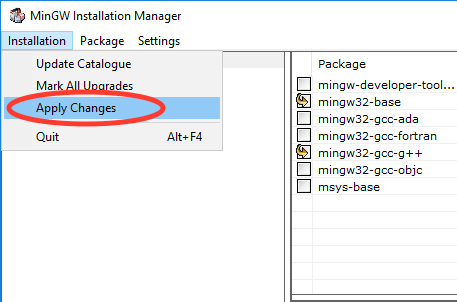
- In the windows that pops up, click Apply.
- Close the MinGW installer.
- Download mingw-get-setup.exe from
https://sourceforge.net/projects/mingw/
Add mingw and mingw\bin to the start of the global path variable. Use part a for Windows 7, part b for Windows 8.1, and part c for Windows 10.
Windows 7:
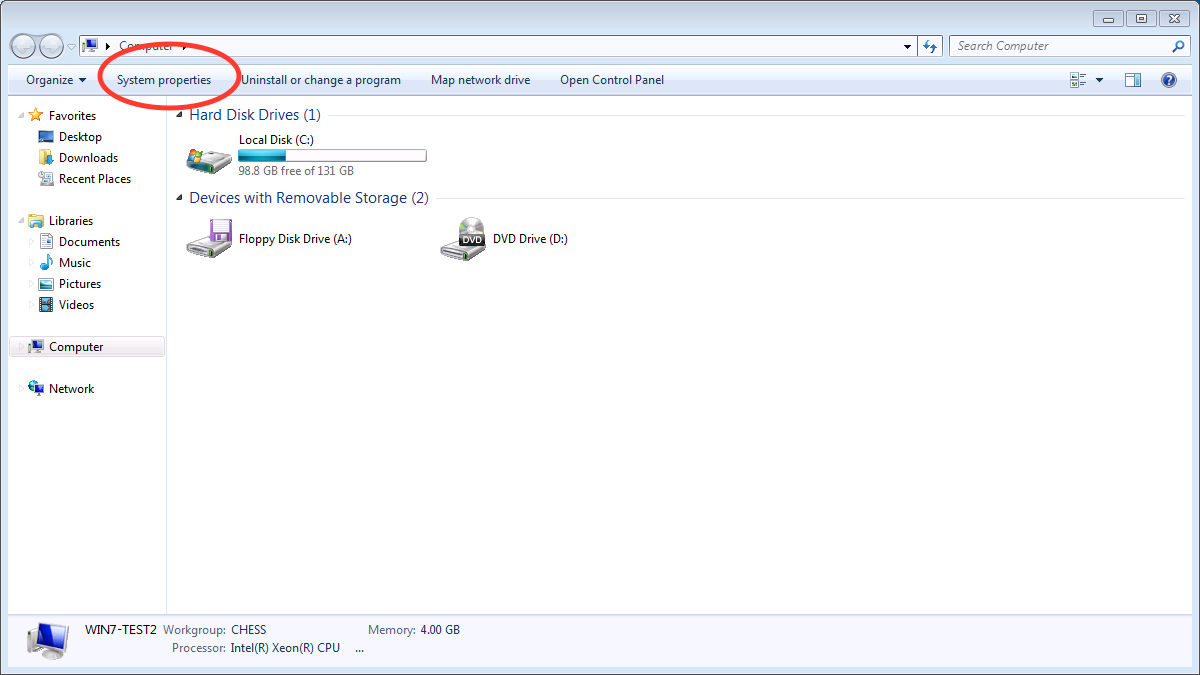
Click on the Start Menu and click on Computer.
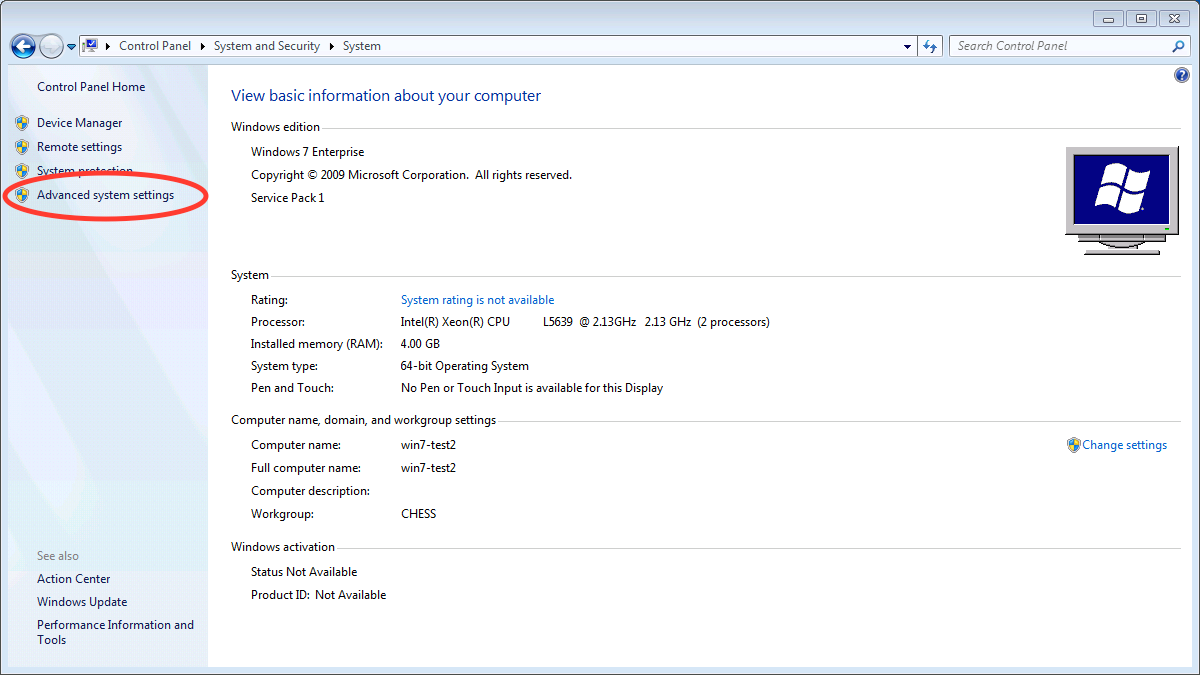
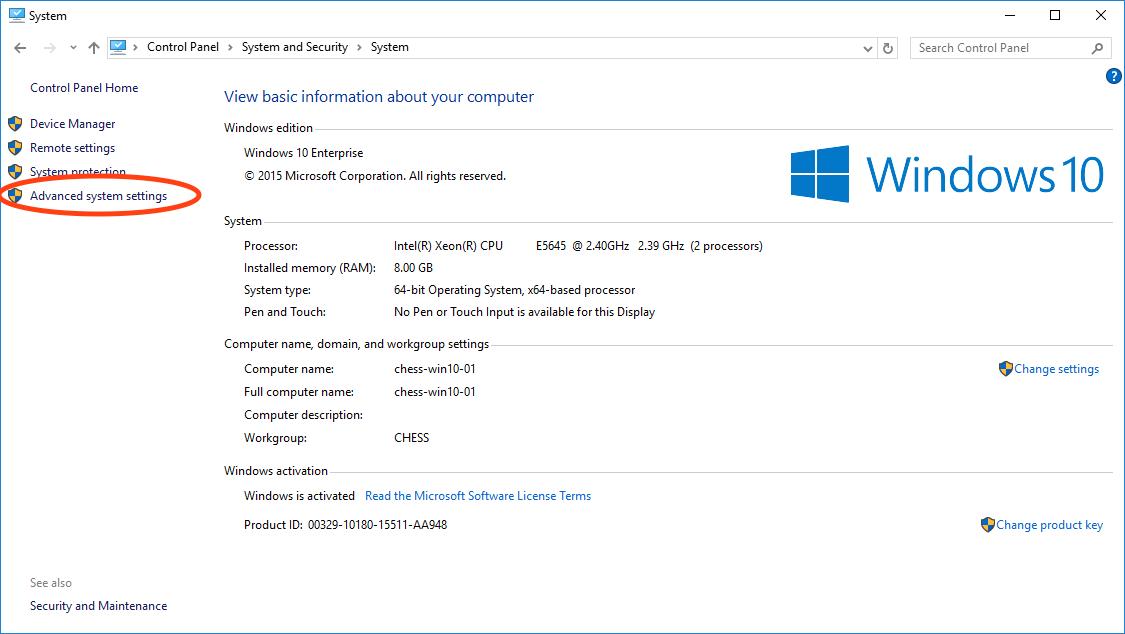
In the window that opens, click on System properties
In the window that opens, click on Advanced system settings
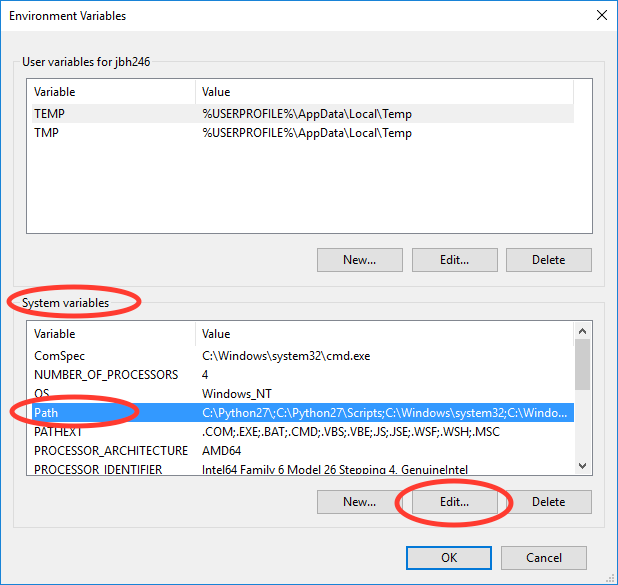
In the window that opens, click on Environment Variables…
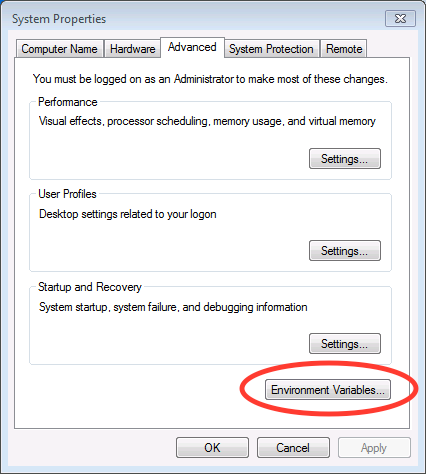
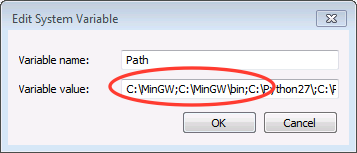
In the window that opens, In the System variables area, select the Path variable and click Edit…
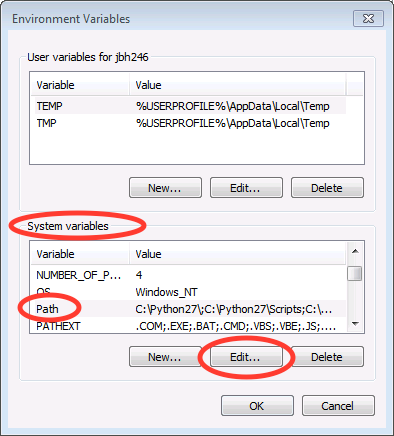
In the window that opens, add the following to the start of the path: C:MinGW;C:MinGWbin;
Click Ok several times to save and exit out of the settings.
Note: You can modify the User variable path instead of the System variable path if you want to only modify the setup for your user account, rather than the entire system. The same steps apply, but if you do not already have a use path variable, you will have to create one using the New button.
Windows 8.1:
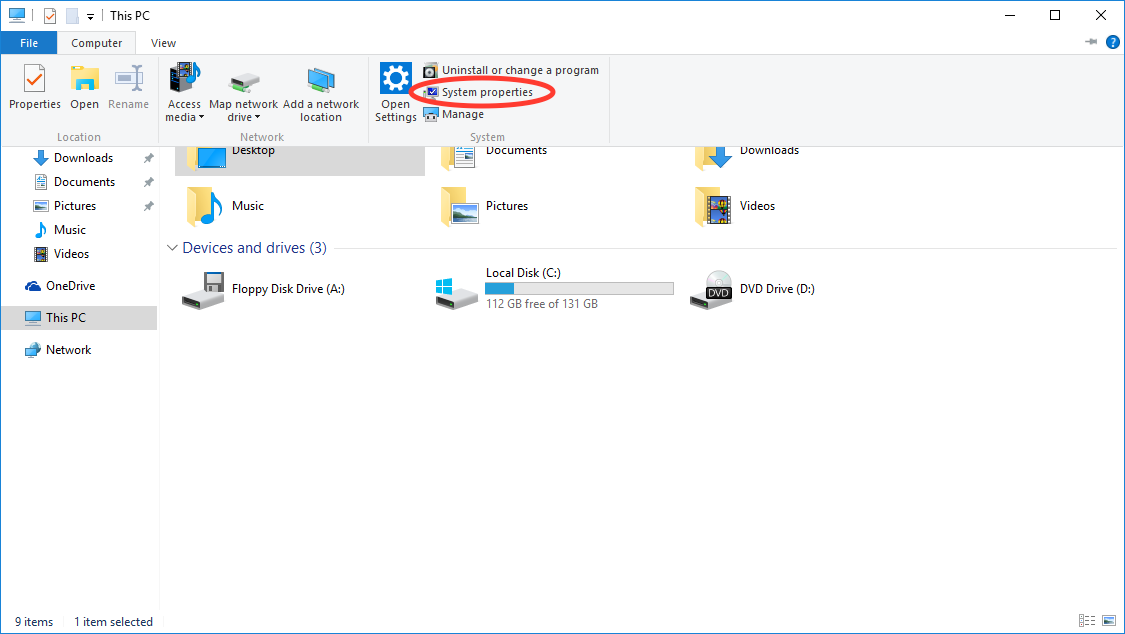
Open a file browser window and click on This PC. At the top, click on System properties.
Continue with steps 3 and onward in the Windows 7 section above.
Windows 10:
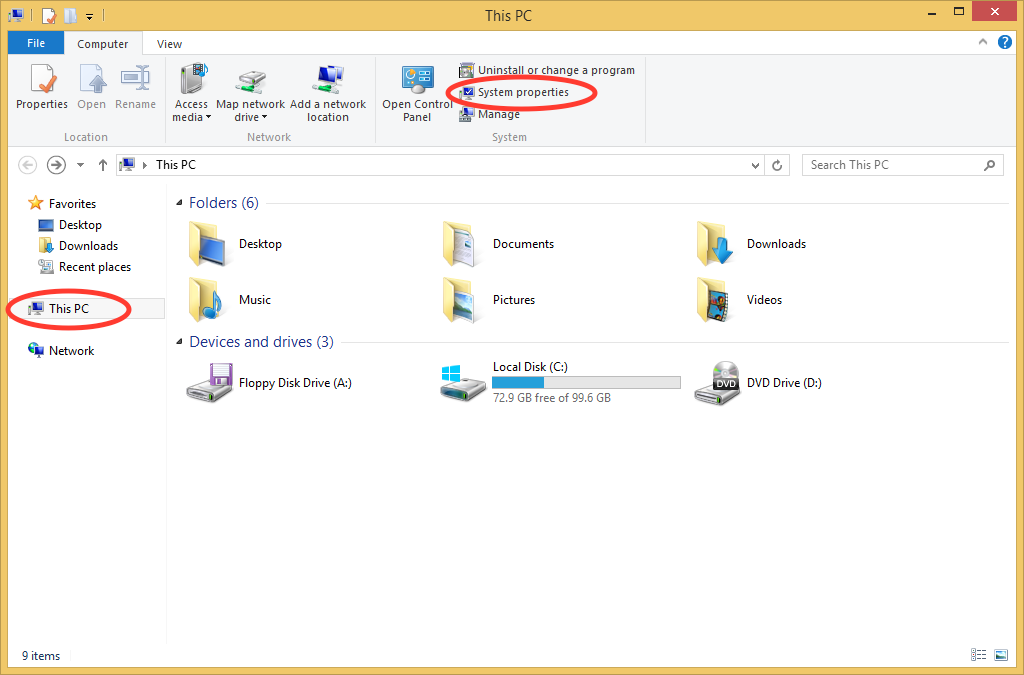
Click on the windows/start menu and click File Explorer.
In the file explorer window, click on This PC and then Computer

Then click on System properties in the new menu
In the window that opens, click on Advanced system settings
In the window that opens, click on Environment Variables…
In the window that opens, In the System variables area, select the Path variable and click Edit…
In the window that opens, use the New button to add these items to the path:
- C:MinGW
- C:MinGWbin;
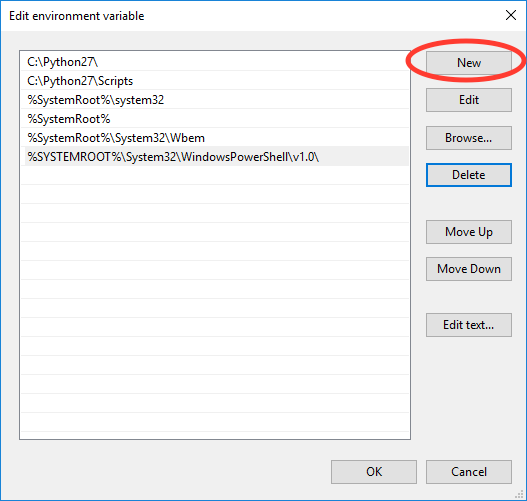
Use the Move Up button to move the items to the start of the path
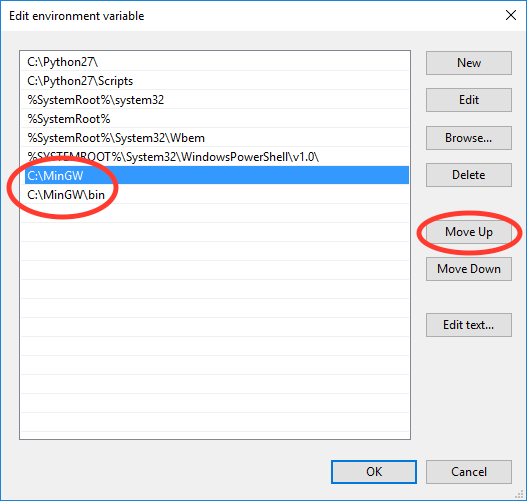
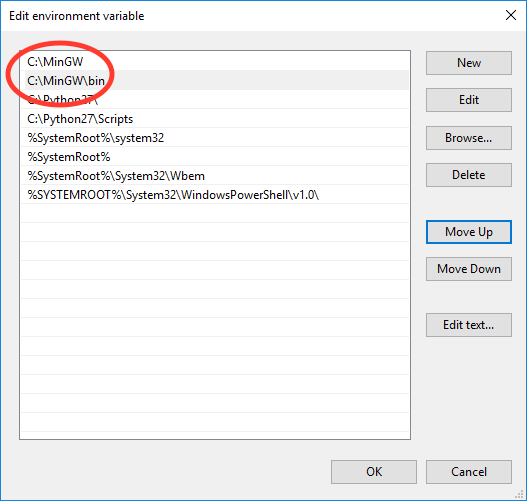
Click Ok several times to save and exit out of the settings.
Note: You can modify the User variable path instead of the System variable path if you want to only modify the setup for your user account, rather than the entire system. The same steps apply, but if you do not already have a user path variable, you will have to create one using the New button.
Restart your computer.
Install numpy, maptlotlib, pillow, fabio using pip
- Open a command prompt
- Windows 7: Click on the start menu, search for cmd and running the cmd program.
- Windows 8: Click on the windows tile and search for cmd, then run the Command Prompt program.
- Windows 10: Click on the windows/start menu, select All Files, select Windows System, and click on Command Prompt.
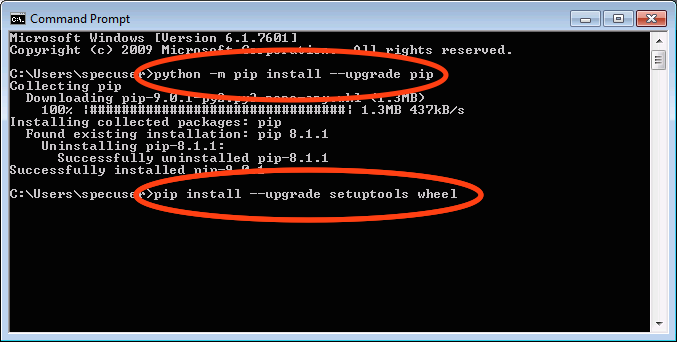
- Type python -m pip install –upgrade pip
- Hit enter
- Once that finishes, type pip install –upgrade setuptools wheel
- Hit enter
- Once that finishes, type pip install numpy
- Hit enter
- Once that finishes, type pip install matplotlib pillow fabio
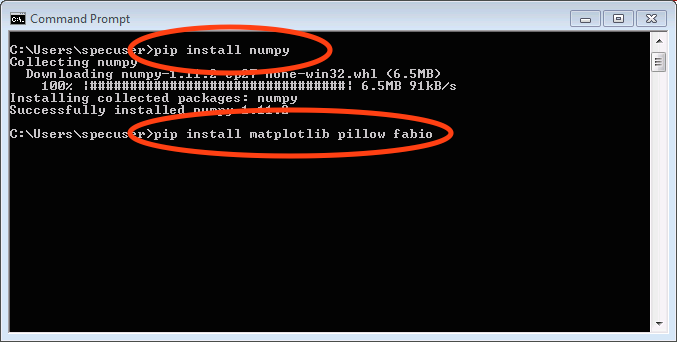
- Hit enter
- Once that finishes, close the command prompt window
- Open a command prompt
Install scipy for 32bit python 2.7 from binary
- Download scipy from
https://sourceforge.net/projects/scipy/files/scipy/0.16.1/
- Download scipy-0.16.1-win32-superpack-python2.7.exe
- Make sure it is the python2.7 file!
- Also available in the RAW-Windows-Source-Install-Essentials file.
- Run the installer, accepting the default options.
- Download scipy from
https://sourceforge.net/projects/scipy/files/scipy/0.16.1/
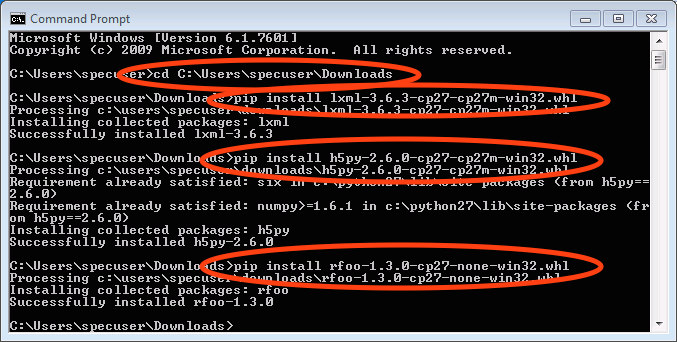
Download and install the lxml, h5py, and rfoo packages.
- Go to
http://www.lfd.uci.edu/~gohlke/pythonlibs/
and download:
- lxml-x.y.z-cp27-cp27m-win32.whl (where x.y.z is the version number).
- h5py-x.y.z-cp27-cp27m-win32.whl (where x.y.z is the version number).
- rfoo-x.y.z-cp27-non-win32.whl (where x.y.z is the version number).
- Note: These are available in the RAW windows install essentials zip file.
- Note: It is important to download the cp27 win32 version, otherwise installation will fail!
- Also available in the RAW-Windows-Source-Install-Essentials file.
- Open a command prompt window as in Step 6.
- Navigate to the folder where you downloaded these files.
- The easiest way to do this is to type “cd” followed by a space, then drag the folder from the desktop into the command prompt window. You should see the path to the folder appear in the command prompt. Hit enter after that.
- Install the files using pip.
- Type pip install lxml-x.y.z-cp27-cp27m-win32.whl and hit enter (where x.y.z is the version number).
- Type pip install h5py-x.y.z-cp27-cp27m-win32.whl and hit enter (where x.y.z is the version number).
- Type pip install rfoo-x.y.z-cp27-non-win32.whl and hit enter (where x.y.z is the version number).
- Go to
http://www.lfd.uci.edu/~gohlke/pythonlibs/
and download:
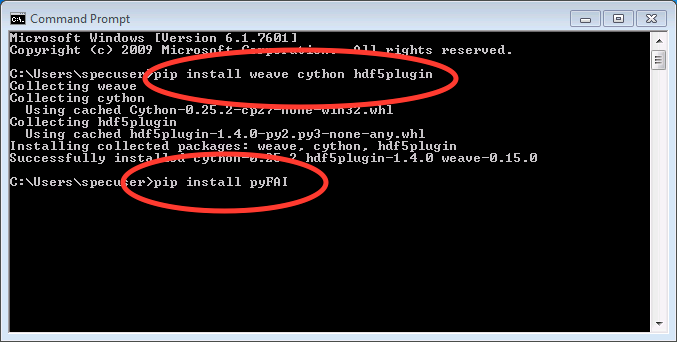
Install the weave, cython, hdf5plugin, and pyFAI packages.
- If it is not already open from the previous step, open a command prompt window as in Step 6.
- Install cython
- Type pip install weave cython hdf5plugin and hit enter.
- Install pyFAI
- Type pip install pyFAI and hit enter.
- On Windows 8 and 10, two windows may pop up, one saying that “mt.exe has topped working” and anther that “an app on your PC needs the following Windows feature: .Net Framework 3.5”. If that happens, in the mt.exe window click “Close Program” and in the other window click “Download and install this feature.” Once the download and installation is done, rerun the pyfai installation using the pip install pyFAI command.
Download RAW from sourceforge ( http://sourceforge.net/projects/bioxtasraw)
- Go to the Files tab on the linked website and download the ‘RAW-x.y.z-Source file, where x.y.z is the version number (for example, 1.0.0).
Expand the downloaded zip file into the downloads folder
- Right click on the download and select ‘Extract All’
- Accept the default location for files to be extracted.

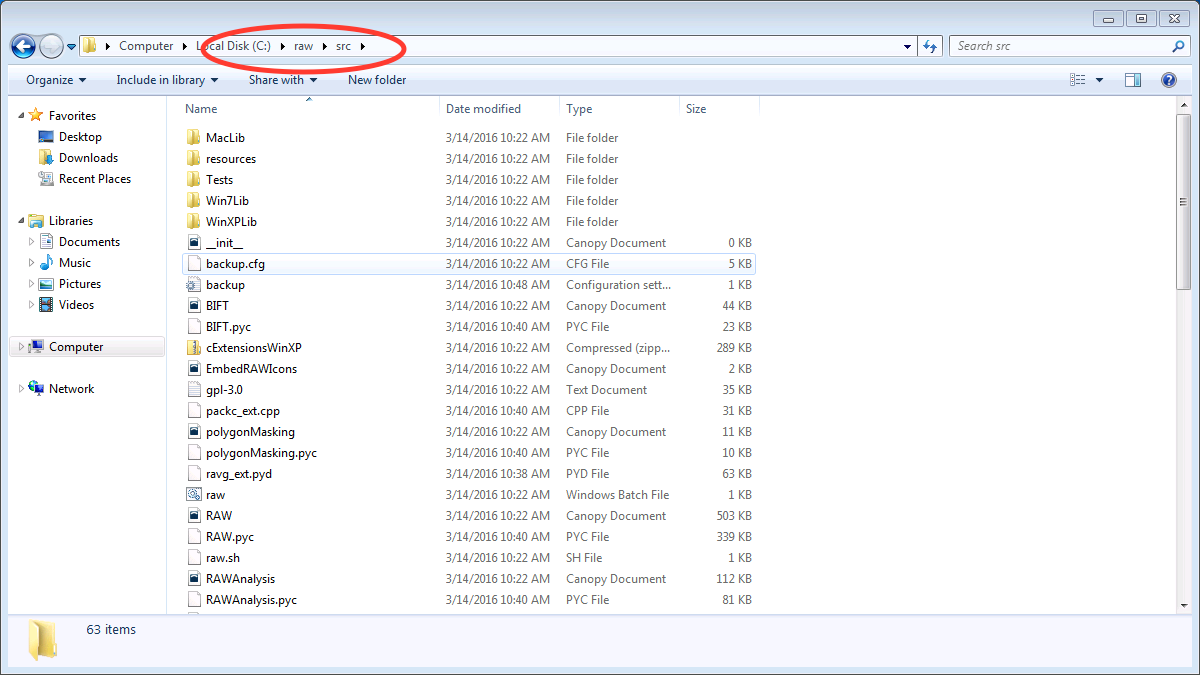
Check that the files are located at the top of the directory, as in the following image:
- Windows 7: Browse to Computer -> Local Disk -> raw
- Windows 8 and 10: Browse to This PC -> Local Disk -> raw
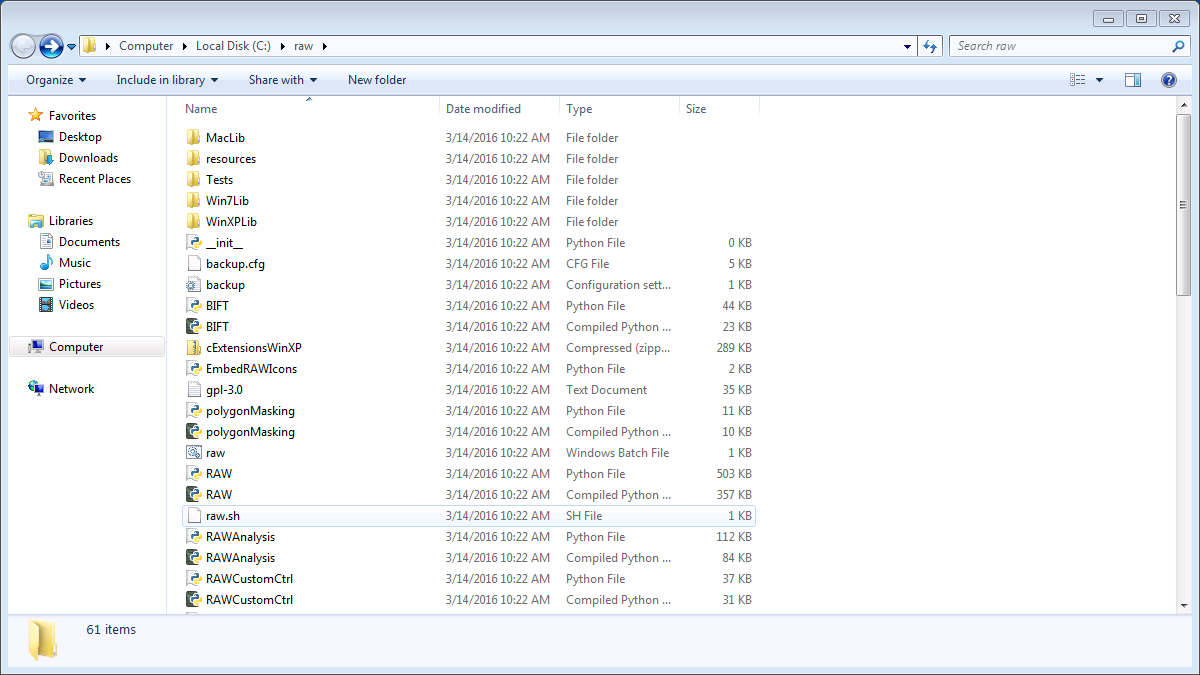
- You may have only a single subfolders, named something like raw or src.
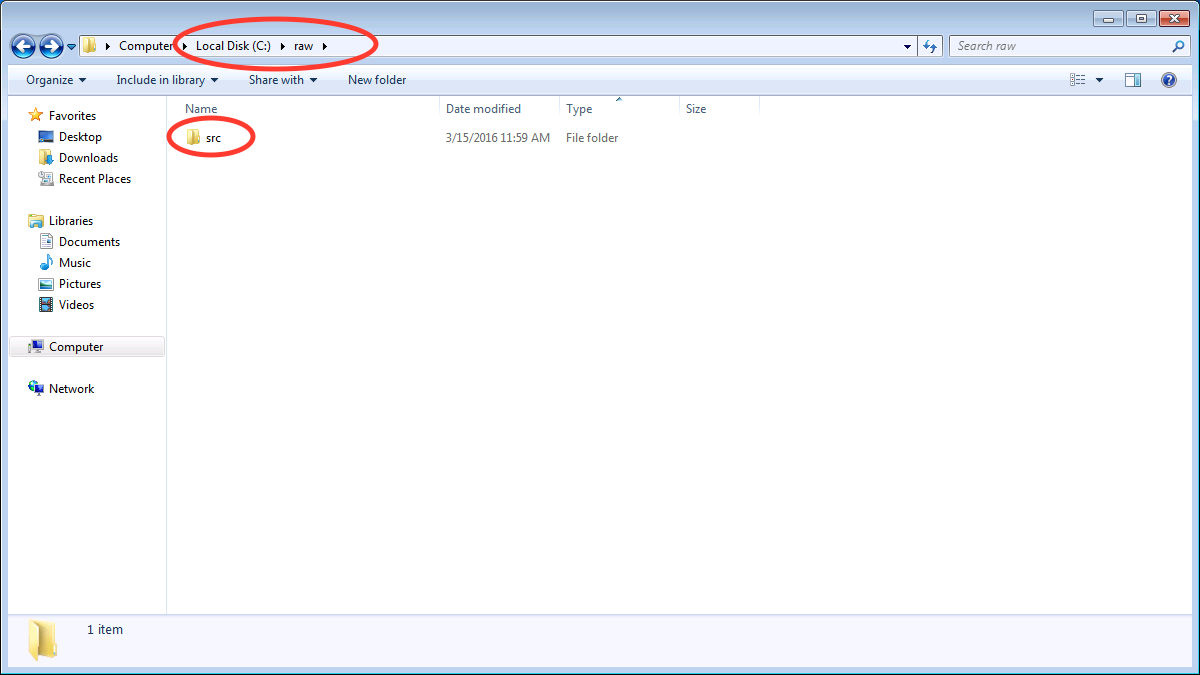
- If so, browse down levels until you find the directory containing files that look like the top image on this page, and copy everything in that folder to the top level raw directory.
Run RAW.py from the command line
- Open a command prompt as in Step 6 of these instructions.
- Type cd C:raw
- Hit enter
- Type python RAW.py
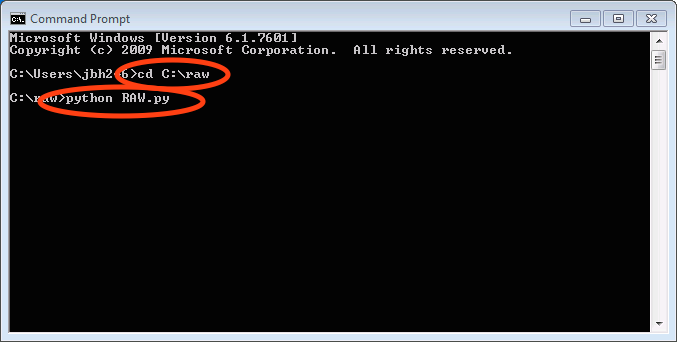
- Hit enter
- When you start RAW for the first time, it compiles various extensions, this may take a while. Please be patient.
Enjoy!
- After running RAW for the first time, you can start it without using the command line simply by double clicking on RAW.py in the C:raw folder.
- If you want to create a desktop shortcut, right click on RAW.py and select Send To -> Desktop.
- If you have trouble with the installation, please see the solutions to common problems section below.
Common problems/troubleshooting
Prebuilt installer:
- Because the RAW team is an ‘unknown’ developer, you will probably see some security warnings when you install RAW. When you do, just give the installer and program permission to run on your computer.
- RAW is used by (relatively) few people, which means many antivirus programs
have not seen the RAW software before. Occasionally virus scanners will mark
a file (typically RAW.exe) as a threat (it will usually be in the ‘general
malware’ category). If this happens, please do the following:
- Upload the file to https://www.virustotal.com/ and see if any other antivirus programs identify it as a problem (it is always possible someone hijacked the installer somehow!).
- If most or all of the antivirus programs on virustotal.com clear the file, make an exception for it in your virus scanner.
- Contact the RAW developers, so we can report the false identification to the virus scanner company and get the file whitelisted in future definitions files.
From source:
- The compiler can fail if there are any spaces in the directory paths. Make sure raw, the compiler (MinGW), and python are all installed in directory paths without spaces in the names.
- The compiler can fail if it tries to compile the modules when some of them are already compiled. If the compilation is failing, try deleting all .pyd files in the raw directory.
- The compiler can fail if you try to compile when you’re not using the command line. This most commonly happens if someone tries to run RAW.py for the first time by double clicking on it, rather than using the python RAW.py command in the command prompt window.
- If the extensions won’t compile properly (you’ll get a popup message when you start RAW warning you of this), you can try copying the precompiled extensions (.pyd files) from the appropriate WinLib folder into the main raw folder.
- If you are updating your RAW installation, you should completely delete the old RAW source files, and then replace them with the new ones.
- You may have trouble with various pieces of the installation if your path variable isn’t set right. The windows PATH variable cannot have spaces. That is, your path should look like: item1;item2;item3 not: item1; item2; item3. For Windows 10, where you enter separate entries in your path variable (which Windows automatically concatenates), make sure that you don’t have leading or training spaces in any of the items.
- On some systems, we’ve found it necessary to install the packages from pip in multiple
steps. If a pip install fails, trying running it on each package separately. For example,
if pip install matplotlib pillow fabio fails, try running:
- pip install matplotlib
- pip install pillow
- pip install fabio