3D reconstruction with bead models – DAMMIF/N and DAMAVER in RAW
Shape reconstruction in SAXS is typically done using bead models (also called dummy atom models, or DAMs). The most common program used to generate these shapes is DAMMIF (and, to a lesser degree, DAMMIN) from the ATSAS package. We will use RAW to run DAMMIF/N. Because the shape reconstruction is not unique, a number of distinct reconstructions are generated, and then a consensus shape is made from the average of these reconstructions. The program DAMAVER from the ATSAS package is the most commonly used program for building consensus shapes. Note that you need ATSAS installed to do this part of the tutorial.
Clear all of the data in RAW. Load the lysozyme.out file that you saved in the reconstruction_data folder in a previous part of the tutorial.
- Note: If you haven’t done the previous part of the tutorial, or forgot to save the results, you can find the lysozyme.out file in the reconstruction_data/lysozyme_complete folder.
Right click on the lysozyme.out item in the IFT list. Select the “Bead Model (DAMMIF/N)” option.
Running DAMMIF generates a lot of files. Click the “Select/Change Directory” button, make a new folder in the reconstruction_data directory called lysozyme_dammif and select that folder.
Change the number of reconstructions to 5.
- Note: It is generally recommended that you do 15-20 reconstructions. However, for the purposes of this tutorial, 5 are enough.
- Note: For final reconstructions for a paper, DAMMIF should be run in Slow mode. For this tutorial, or for obtaining an initial quick look at results, Fast mode is fine.
Uncheck the “Refine average with dammin” checkbox.
- Note: For final reconstructions for a paper, DAMMIN refinement should be done. However, it is quite slow, so for the purposes of this tutorial we won’t do it.
If it’s not already checked, check the “Align and cluster envelopes (damclust)” checkbox.
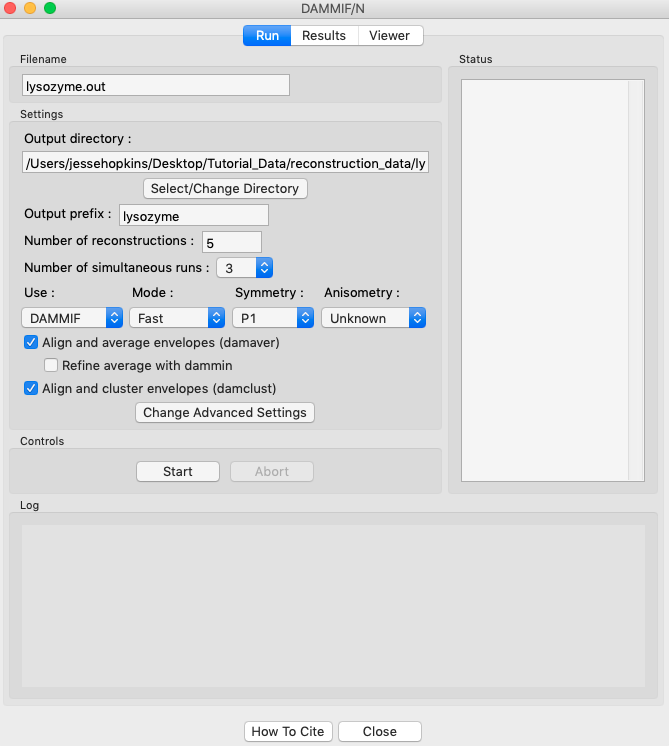
Click the “Start” button.
- Note: The status panel will show you the overall status of the reconstructions. You can look at the detailed status of each run by clicking the appropriate tab in the log panel.
Note that by default the envelopes are aligned and averaged using DAMAVER, and then the aligned and averaged profile is refined using DAMMIN. Clustering analysis is also done by default.
- Some settings are accessible in the panel, and all settings can be changed in the advanced settings panel.
Wait for all of the DAMMIF runs and DAMAVER to finish. Depending on the speed of your computer this could take a bit.
Once the reconstructions are finished, the window should automatically switch to the results tab. If it doesn’t, click on the results tab.
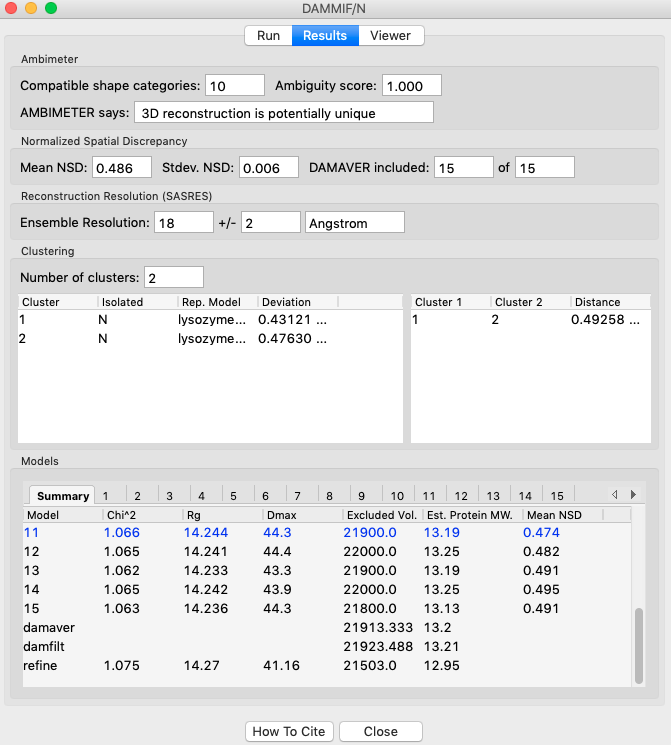
The results panel summarizes the results of the reconstruction run. At the top of the panel there is the ambimeter evaluation of how ambiguous the reconstructions might be (see previous tutorial section). If DAMAVER was run, there are results from the normalized spatial discrepancy (NSD), showing the mean and standard deviation of the NSD, as well as how many of the reconstructions were included in the average. If DAMAVER was run on 3 or more reconstructions, and ATSAS >=2.8.0 is installed, there will be the output of SASRES which provides information on the resolution of the reconstruction. If DAMCLUST was run the number of clusters, information on each cluster, and the distance between each cluster is shown.
Information on each individual model is shown at the bottom. The summary tab gives the model chi squared, Rg, Dmax, excluded volume, molecular weight estimated from the excluded volume, and, if appropriate, mean NSD of the model.
- Any models rejected from the average by DAMAVER will be shown in red in the summary tab list.
- Tip: The model highlighted in blue in the summary tab is the ‘most probable’ model, this can be used as your final bead model instead of doing a dammin refinement.
- Note: Above we show the results for 15 runs instead of the 5 in the tutorial.
Also, each individual model has a tab which shows the data, the model fit, and the residuals.

The results summary shown in Summary tab is automatically saved as a <prefix>_dammif_results.csv csv file, e.g. for this data as lysozyme_dammif_results.csv. All the plots shown on the individual model tabs are automatically saved as a multi-page pdf file with the same name.
Click on the Viewer tab to open the model viewer.
- Note: The model viewer is intended for a fast first look at the results. It is not currently up to the standards of a program like pyMOL.

Click and drag the model to spin it.
- Note: For lysozyme, it should look more or less like a flattened sphere.
Right click and drag the model to zoom in and out.
Use the “Model to display” menu in the Viewer Controls box to change which reconstruction is displayed.
Click the “Close” button when you are finished looking at the results and reconstructions.
The results from individual DAMMIF runs are saved in the selected output folder with the name <prefix>_xx, where xx is the run number: 01, 02, etc. For this tutorial, that would be lysozyme_01, lysozyme_02, and so on. The different files produced are described in the DAMMIF manual.
- Note: Generally, the file of interest is the -1.pdb file, in this case lysozyme_01-1.pdb, lysozyme_02-1.pdb, etc.
If averaging was done with DAMAVER, the results are saved in the selected output folder with the given prefix, in this case lysozyme. The output files generated are described in the DAMAVER manual.
- Note: Generally, the files of interest are the generated pdbs: <prefix>_damaver.pdb and <prefix>_damfilt.pdb. For this tutorial, those would be lysozyme_damaver.pdb and lysozyme_damfilt.pdb.
If clustering was done with DAMCLUST, the results are saved in the selected output folder with the given prefix (for this tutorial, lysozyme). The files generated are described in the DAMCLUST manual.
If refinement was done with DAMMIN, the results are saved in the selected output folder as refine_<prefix>, e.g. for this tutorial refine_lysozyme. The files generated are described in the DAMMIN manual.
- Note: Generally, the file of interest is the -1.pdb file, in this case refine_lysozyme-1.pdb.